
Paymasters introduction
Learn about paymasters and use one to pay transaction fees with your own token
This tutorial makes use of smart contracts deployed in the previous two tutorials, Deploy your first contract and Create an ERC20 token. This section introduces one of the custom features of Validium: native account abstraction and paymasters.
In this tutorial we will:
Learn about paymasters.
Review the testnet paymaster smart contract code.
Use the testnet paymaster to pay transaction fees with our own ERC20 token.
Prerequisites
Before you start, make sure that you’ve configured the Validium Sepolia Testnet in your browser wallet by following the instructions here.
In addition, fund your wallet with Validium Sepolia Testnet ETH using one of the available faucets.
What is a Paymaster?
Paymasters in the Validium ecosystem represent a groundbreaking approach to handling transaction fees. They are special accounts designed to subsidize transaction costs for other accounts, potentially making certain transactions free for end-users. This feature is particularly useful for dApp developers looking to improve their platform's accessibility and user experience by covering transaction fees on behalf of their users.
Every paymaster has the following two functions:
validateAndPayForPaymasterTransaction: this function uses the transaction parameters (fields likefrom,amount,to) to execute the required validations and pay for the transaction fee.postTransaction: this optional function runs after the transaction is executed.
Paymaster smart contract code
Although application developers are encouraged to create their own paymaster smart contract, Validium provides a testnet paymaster for convenience and testing purposes.
The paymaster smart contract code is provided "as-is" without any express or implied warranties.
Users are solely responsible for ensuring that their design, implementation, and use of the paymaster smart contract software complies with all applicable laws, including but not limited to money transmission, anti-money laundering (AML), and payment processing regulations.
The developers and publishers of this software disclaim any liability for any legal issues that may arise from its use.
The testnet paymaster address is 0x3cb2b87d10ac01736a65688f3e0fb1b070b3eea3
TestnetPaymaster.sol
In the validateAndPayForPaymasterTransaction it is:
Checking that the paymasterInput is
approvalBased.Checking that the allowance of a given ERC20 is enough.
Transferring the transaction fee (
requiredETH) in ERC20 from the user’s balance to the paymaster.Transferring the transaction fee in ETH from the paymaster contract to the bootloader.
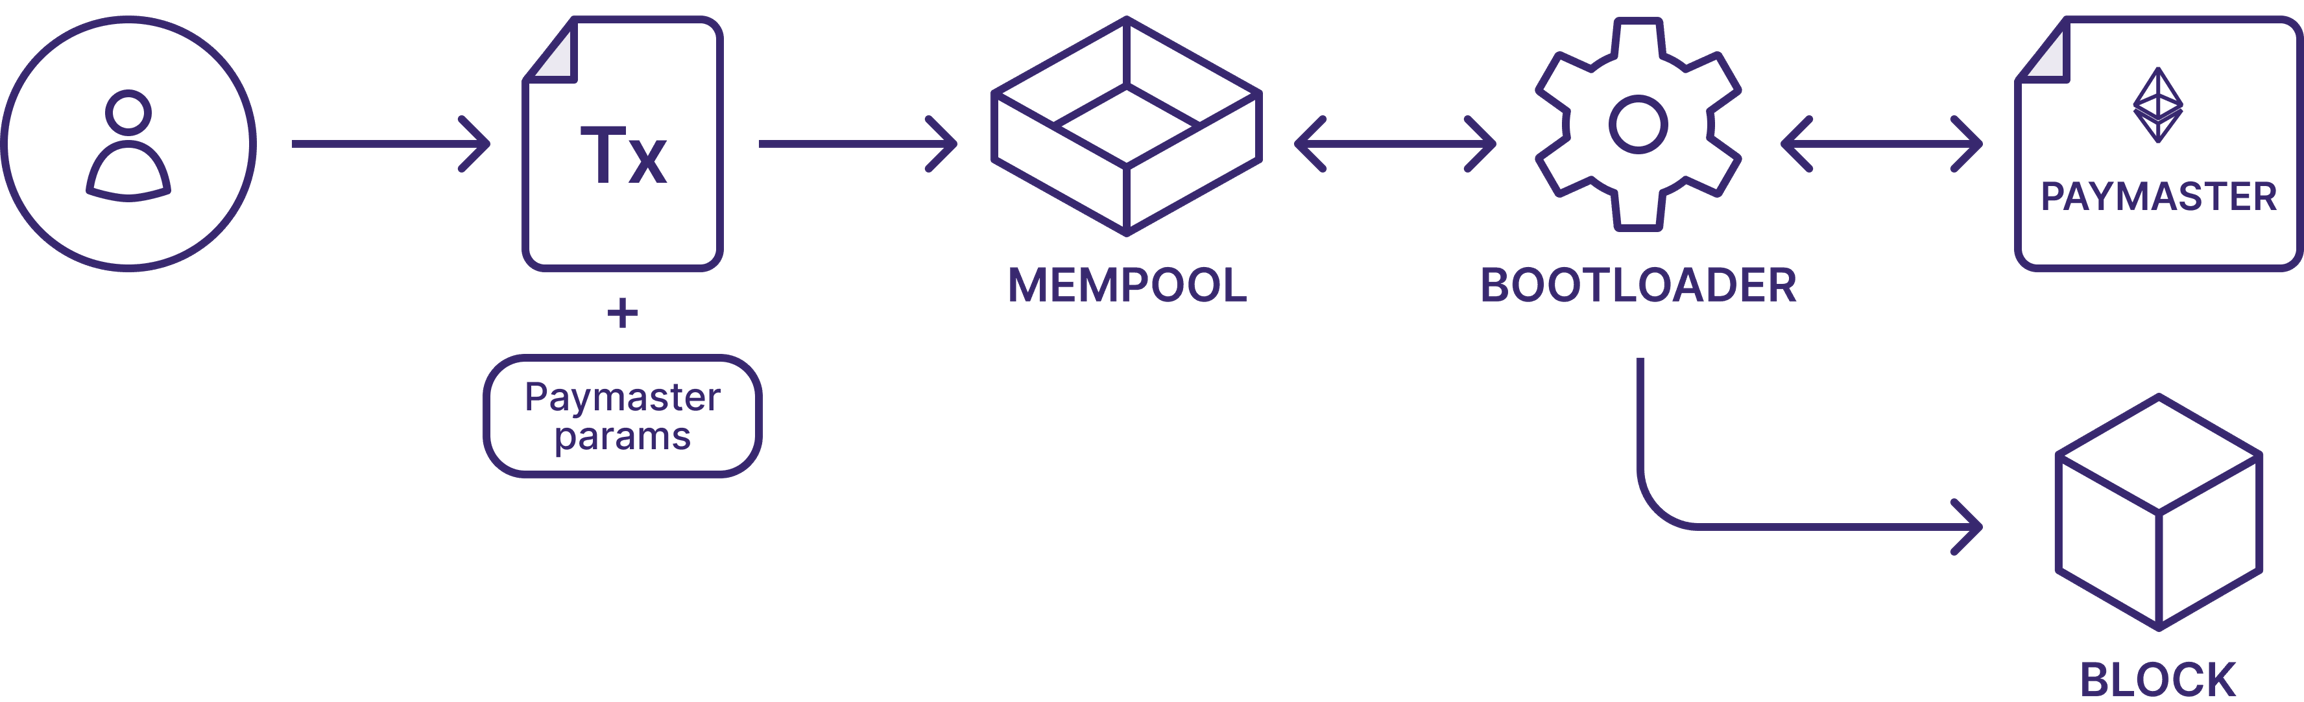
How to send a transaction through a paymaster?
In order to send a transaction through a paymaster, the transaction must include the following additional parameters:
paymasterAddress: the smart contract address of the paymastertype: should beGeneralorApprovalBased(to pay fees with ERC20 tokens)minimalAllowance: the amount of ERC20 tokens to be approved for spending (forapprovalBasedtype paymasters only).innerInput: any payload we want to send to the paymaster (optional).
We’ll see an example next.
Interacting with the testnet paymaster
We’re going to interact with the ZeekMessages.sol contract that we created in the first tutorial and use the ERC20 token that we deployed in the second tutorial to pay the transaction fees.
AtlasRemix
Click the following button to open the project in Atlas:
It’ll open the script to send a transaction via the paymaster. Let’s go through the most important parts:
Retrieve the token balance
In this part we’re retrieving the ETH and ERC20 token balances of the account. We’ll compare them after the transaction is executed to see the difference.
Estimate transaction fee
Retrieve the testnet paymaster address.
Generate the paymaster parameters to estimate the transaction fees passing the paymaster address, token address, and
ApprovalBasedas the paymaster flow type.Retrieve the
gasLimitof sending the transaction with the paymaster params.Calculate the final estimated fee which is equal to
gasPricemultiplied bygasLimit.
Send the transaction
Create the new paymaster params with the calculated
feeasminimalAllowance.Complete the transaction overrides object with
maxFeePerGas,maxPriorityFeePerGasandgasPerPubdataSend the transaction including the
txOverrides
Compare the final balance
Finally we retrieve and print the ETH and ERC20 balances to see how they’ve changed.
Run the script
To run the script, first enter the addresses of the ZeekMessages.sol and TestToken.sol contracts that we deployed previously (Deploy your first contract and Erc20 Token) in the following variables at the beginning of the script:
Next, make sure the script file is selected in the Atlas editor and click on the “Deploy” button.

You’ll see the progress in the console.
If everything worked as expected, only the ERC20 balance will decrease, meaning the fee was paid with the ERC20 token instead of ETH.
Takeaways
Paymasters on Validium allow any account to pay fees with ERC20 tokens or enable gasless transactions.
Paymasters are smart contracts that can have any validations and rules.
To send a transaction through a paymaster, we only need to include additional parameters in the transaction.
Next steps
Learn more about paymasters and native account abstraction in this section of the docs.
Browse different paymaster examples in this open source repository.
Continue learning in ZKsync 101 by building a GoFundMe clone.
Last updated